-
How to add multiple mining subaccounts?
-
What features are available when mining with a logged-in account?
-
HumPool Mining Pool GRAM Mining Tutorial
-
HumPool Mining Pool KLS (Karlsen) Mining Tutorial
-
HumPool Mining Pool IRON (Iron Fish) Mining Tutorial
-
HumPool Mining Pool KAS Mining Tutorial
-
HumPool Mining Pool ALPH Mining Tutorial
-
HumPool Mining Pool RXD Mining Tutorial
-
How to register a HumPool mining account?
-
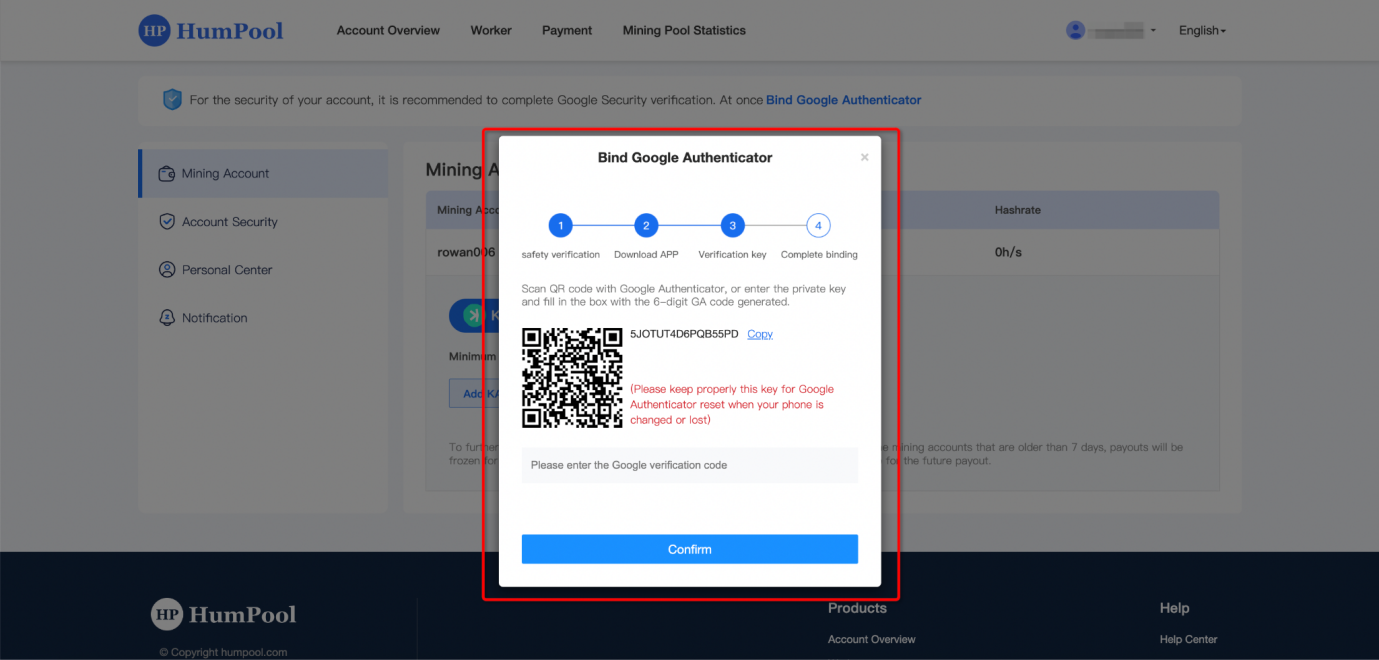
How to bind Google two-factor authentication?
-
How to add/modify KAS wallet address?
-
How to modify the minimum payment amount?
-
How to check the mining income after logging into the mining account?
-
How to check miner information when logging into an account for mining?
-
How to Use Kaspa Transaction Accelerator
HumPool supports adding multiple mining subaccounts, which can be used as mining accounts independently. The hashrate and mining income of each subaccount will be displayed independently. It is convenient to manage multiple mines, multiple customers, or mining of different currencies.
1. You can set different wallet addresses to receive payments.
2. You can set different alarm notification email addresses and Telegram accounts separately.
3. Convenient management of multiple different mining accounts and mining currencies.
You can set up multiple mining subaccounts according to your needs to manage multiple proxy users, monitor the hashrate of multiple mining farms and multiple mining machines, or settle the mining income of each subaccount separately. Each subaccount has independent mining pool and wallet management, and can also set independent hashrate change reminder notifications.
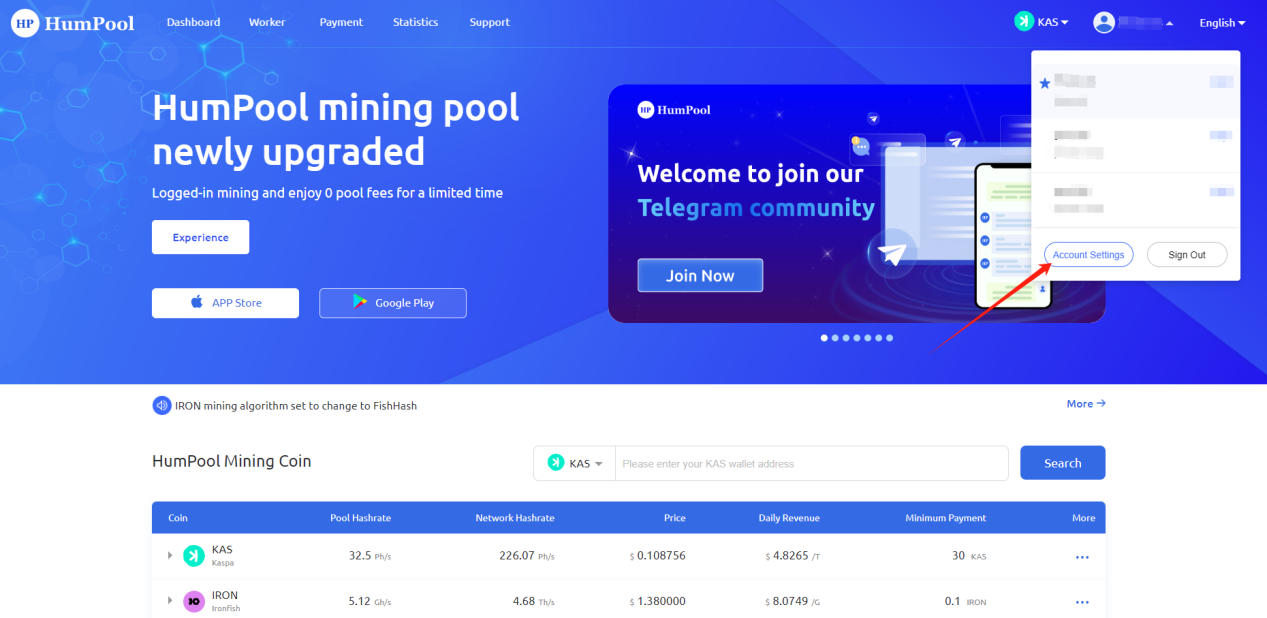
1.Enter HumPool official website (https://humpool.com/) and log in to your account. Click [Account Settings] in the account drop-down menu to set up
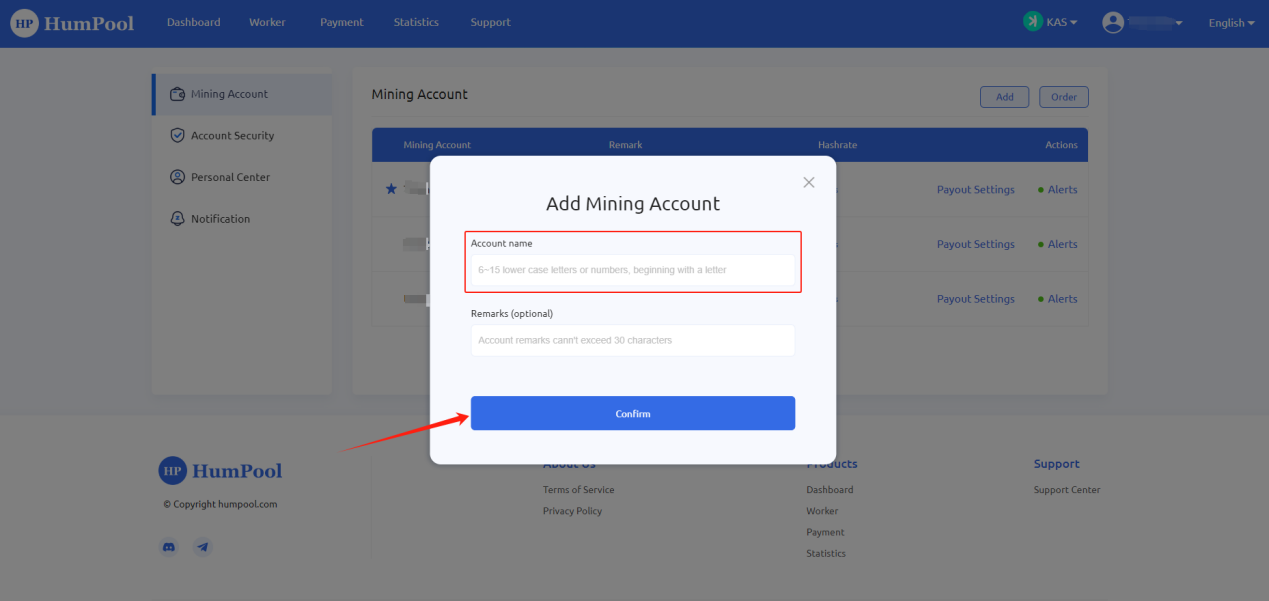
2. After entering the mining account setting page, in the mining account option, click the [Add] button to add

3. Enter the account name (6~15 lower case letters or numbers, beginning with a letter.) and add a note (optional) on the pop-up page. After filling in the information, click [Confirm] to complete the addition.
1. If there are many subaccounts, you can sort the accounts. Click the [Order] button on the mining account page to order.

2. Enter the sorting page and drag the entire row to sort, or click the [Top] button to sort. After the sorting is completed, click [Save].

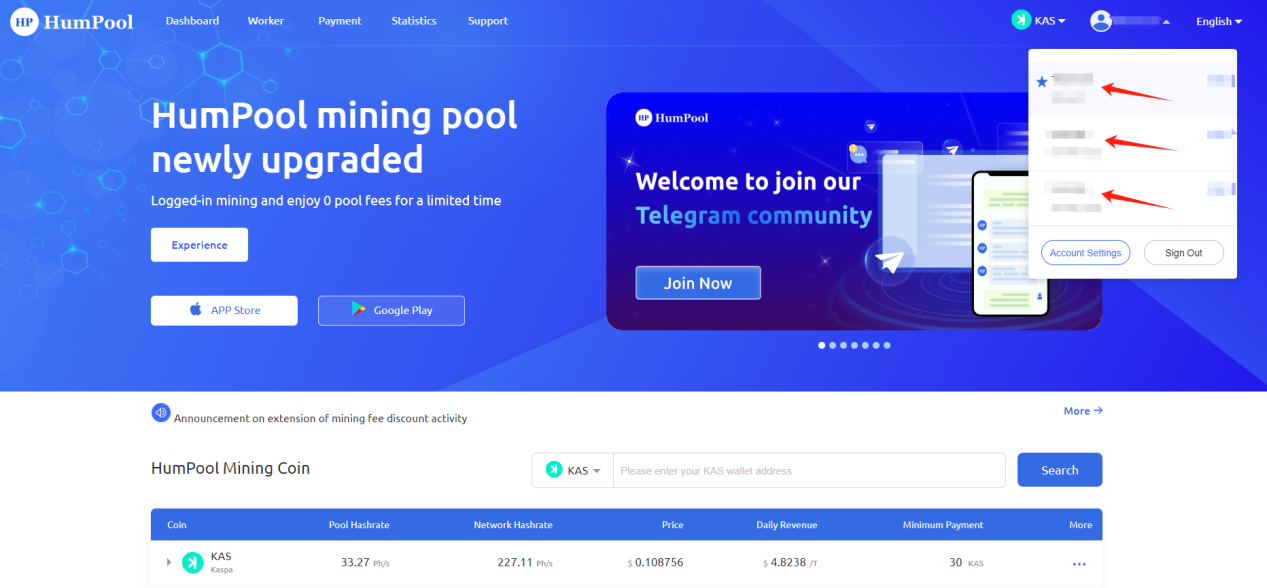
Enter the HumPool official website (https://humpool.com/) and log in to your account. Click the drop-down menu of the mining account and click the subaccount you want to switch to. After the switch is completed, the mining pool will display the mining data information of the current subaccount.
To log in to an account for mining, you need to register an account before you can mine. After the account registration is completed, log in to the system and paste the HumPool mining account name into the User section of the ASIC mining machine or the column where the wallet address needs to be filled in in the mining software. Miners need to log in to their account to perform operations such as hashrate, income inquiry or miner management.
Logged-in mining also has the following core advantages:
1. Logged-in mining and enjoy 0 pool fee for a limited time
2. You can set the minimum amount when logged-in mining
3. You can set alarm notifications when logged-in mining
4. Logged-in mining and add more sub-accounts
5. Logged-in mining to experience more new features
HumPool Mining Pool GRAM Mining Tutorial
HumPool has officially launched the Gram (GRAM) mining pool. To ensure safe and efficient mining, the Gram pool uses account name mining and does not support anonymous mining. Please register a HumPool account before you start mining.
1.Open the homepage of the HumPool mining pool:https://www.humpool.com/
Find the GRAM mining currency information on the homepage of the website,Click【Get Mining Address】to obtain the Gram mining address (Note: You need to log in to HumPool first if you are not already logged in)

2.Copy the mining server address information from the window on the right. Enter the miner's backend or use the bulk management software provided by the miner's official website to set up the mining address.

3. Set Mining Parameters
Enter the IP address of the miner in the browser address bar, enter the backend of the miner, or use the batch management software officially provided by the miner to set the following information:
User / Worker: Your account name.worker name(This should be the HumPool account name you set during registration, not your wallet address or email. The account name and worker name are separated by a period " . ". The worker name must be between 6-15 characters, using lowercase letters or numbers, and must start with a letter.)
Mining example:
./gram-miner -s stratum+tcp://gram.eu1.humpool.com:14581 -a account.workername
Password: Set any password (e.g., 123).
After verifying that the information is correct, save the settings. Within a short time, the miner will begin operation, and you can start earning rewards.
4、Configure the wallet address in your mining account
Log in to your mining account and select the GRAM currency. Click the [Add GRAM Address] button, and a page for adding the GRAM address will pop up. Fill in the GRAM wallet address information and then click【Confirm】.(Note:Before adding or changing your address, please confirm whether the address you are using has the required minimum deposit amount to avoid unnecessary losses.
Only activated GRAM wallet addresses are supported (wallet addresses of exchanges are not supported)


5、Activate the GRAM Address
If your GRAM wallet address is not activated, please activate the address first. You can click on【How do I activate My address?】to see how to activate your GRAM address
1.Please enter the GRAM wallet first. It is recommended to use Tonkeeper Ton official wallet (exchange wallet addresses are not supported).
2.Use the Ton address of the GRAM wallet you want to receive payment to create a transfer transaction. Only after activating the Ton address can you receive the transfer from the mining pool.
3.After the Ton address is activated, check the activation status of the GRAM wallet address through the blockchain browser (https://tonviewer.com)
4. After the GRAM wallet address is activated, fill it in the payment address text box, and the mining pool will automatically pay mining profits every day.


6.Complete Wallet Address Configuration
After submission, please check the email sent by the system to the email bound to Humpool and click the link in the email to activate the address.

7.How to check GRAM earnings
Click on【Payment】in the top navigation bar,Then select【GRAM】from the currency options on the right to view your GRAM mining earnings.

Karlsen (KLS) introduced a GPU-centric fork aimed at empowering small-scale miners and increasing decentralization. This strategic shift toward GPU mining made it easier for users to participate, by reducing the efficiency advantage of ASICs. Not only promotes inclusivity and sustainability, but also enhances network security, in line with the core principles of decentralization inherent in blockchain technology.
To Logged-in mining, you need to register a HumPool account. Configure the account name and mining parameters in the mining machine management background to start mining. Through the mining account, you can monitor the miner status and mining pool income.
Open the homepage of the HumPool mining pool:https://www.humpool.com/
Click the [Register] button on the navigation bar to enter the registration page. Follow the instructions on the page to complete the registration and obtain the user name. If you have registered a HumPool account, you can directly log in to the personal center and copy the account name for setting up Set mining parameters.
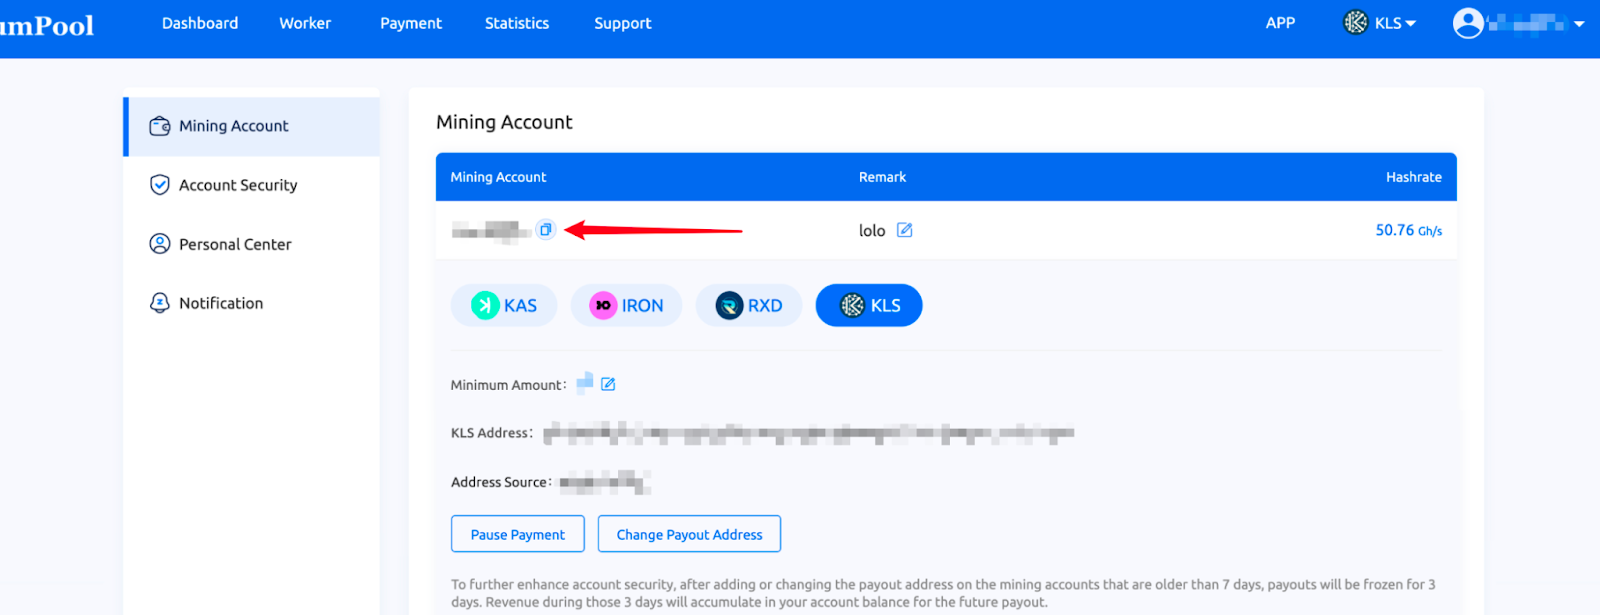
After you start mining, the mining income will be automatically accumulated in the mining account, and you can receive the income after binding the wallet.
Enter the miner's IP address in your browser's address bar to access the miner's backend, or use the official batch management software provided by the miner to configure the following settings:
HumPool / URL:stratum+tcp://kls.asia1.humpool.com:12800
User / Worker:Account name. Miner number (This should be the HumPool account name you set during registration, not your wallet address or email. The account name and worker name are separated by a period " . ". The worker name must be between 6-15 characters, using lowercase letters or numbers, and must start with a letter.)
Password:Set any password (e.g., 123)
After verifying that the information is correct, save the settings. Within a short time, the miner will begin operation, and you can start earning rewards.
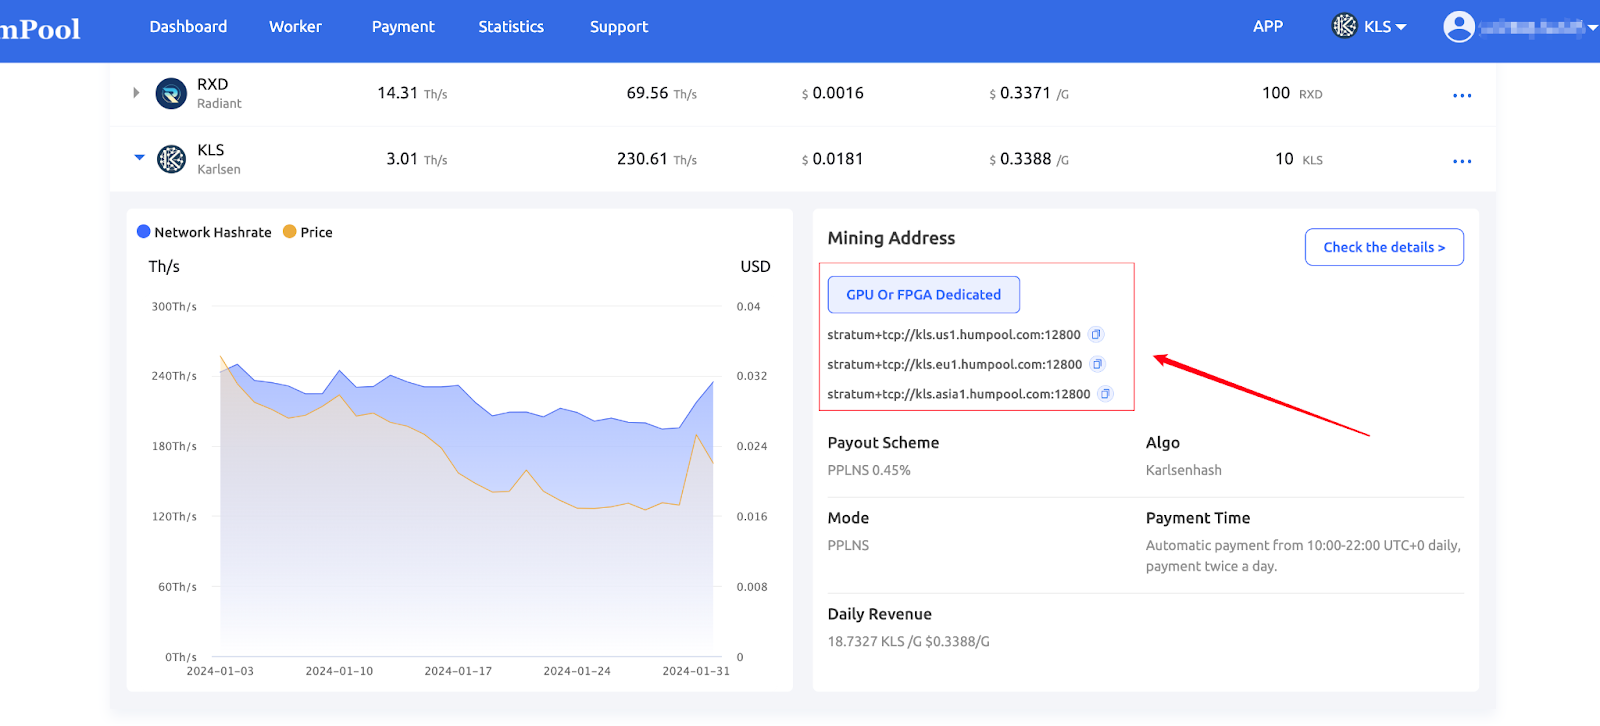
| GPU Or FPGA Dedicated |
|---|
| stratum+tcp://iron.us1.humpool.com:13800 |
| stratum+tcp://iron.eu1.humpool.com:13800 |
| stratum+tcp://iron.asia1.humpool.com:13800 |
Log in/register to the exchange, find KLS and deposit to get the wallet address.
XT.COM:https://www.xt.com/
XEggex:https://xeggex.com/
Tradeogre:https://tradeogre.com/
Note: Different countries have varying regulatory policies for exchanges, and the associated risks are the responsibility of the miner.
Log in to the mining account, select the KLS currency, click the [Add KLS Address] button, and the page to add the KLS address will pop up. Fill in the IRON wallet address information to obtain stable mining income.
Address example:karlsen:qqf8flv684emhq85h7z96qta4lwsgg09rc8l5zsnwyf59gejtlpfw6clzlxe3
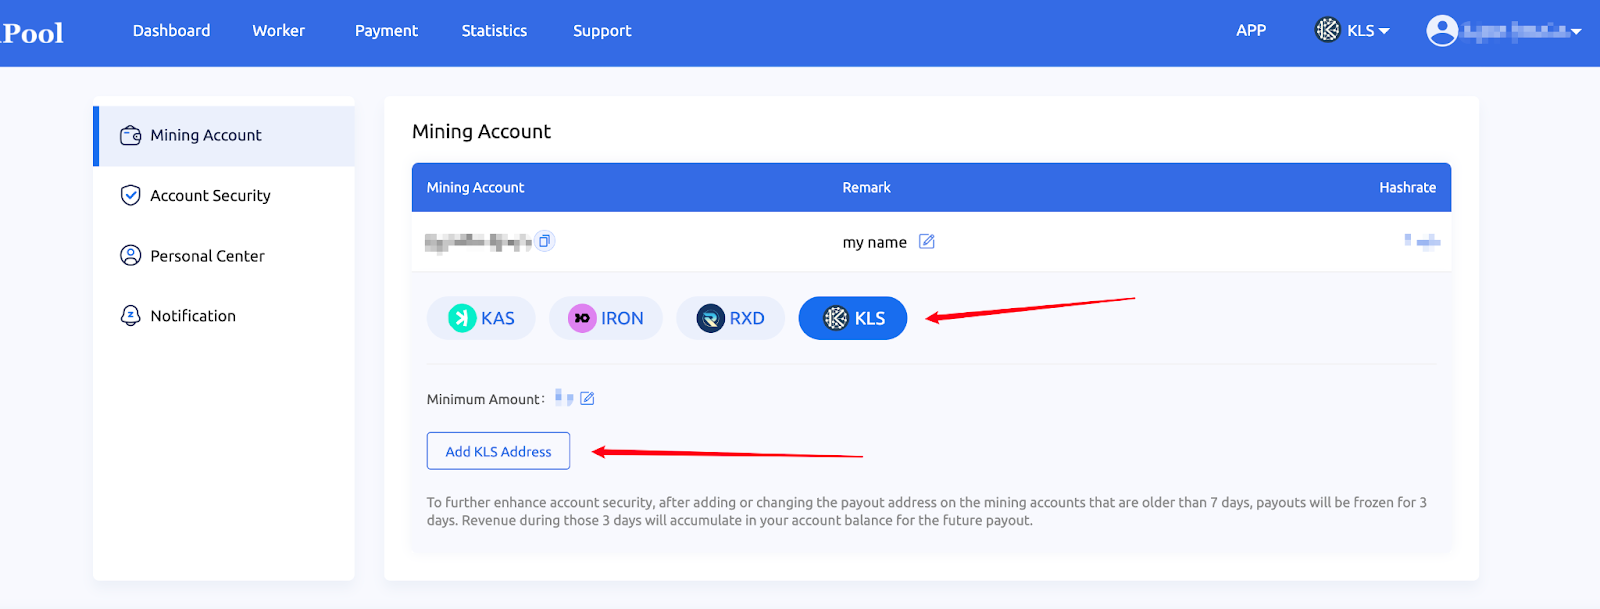
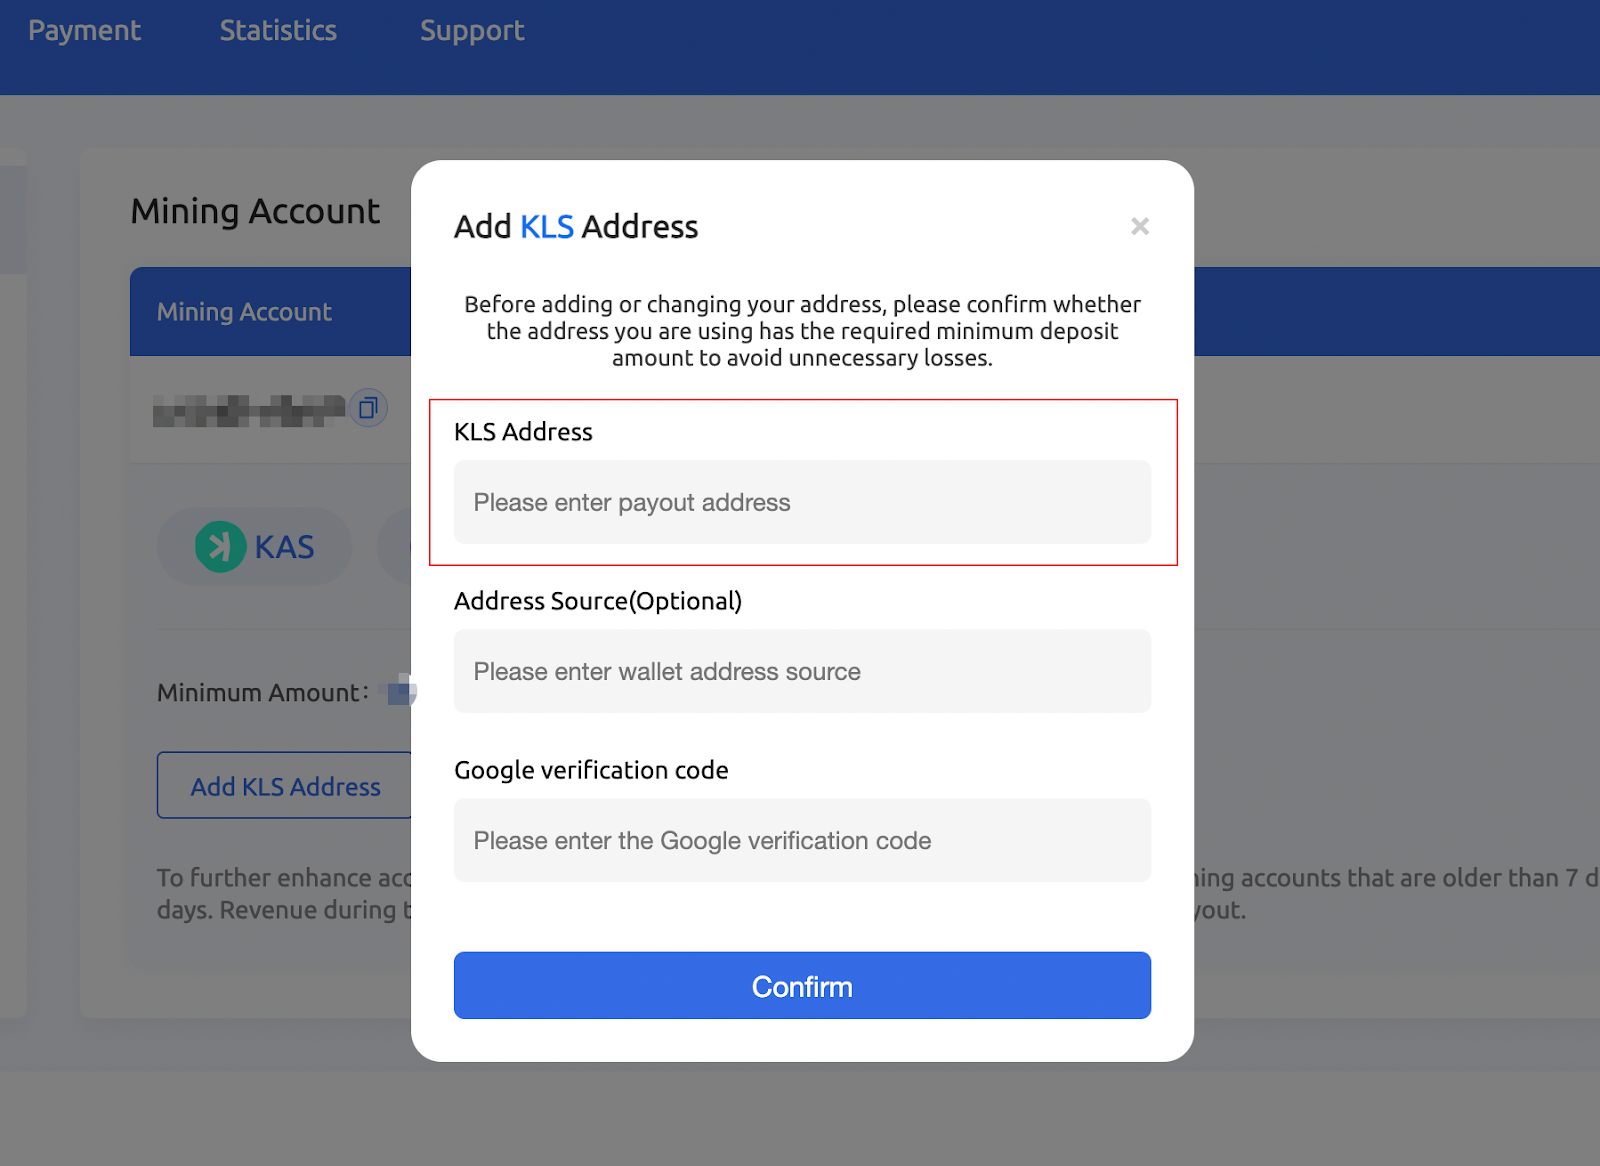
After filling in the address, click the [Confirm] button to save. At the same time, the system will send an email to activate the address, requiring you to activate the address in order to receive mining income.
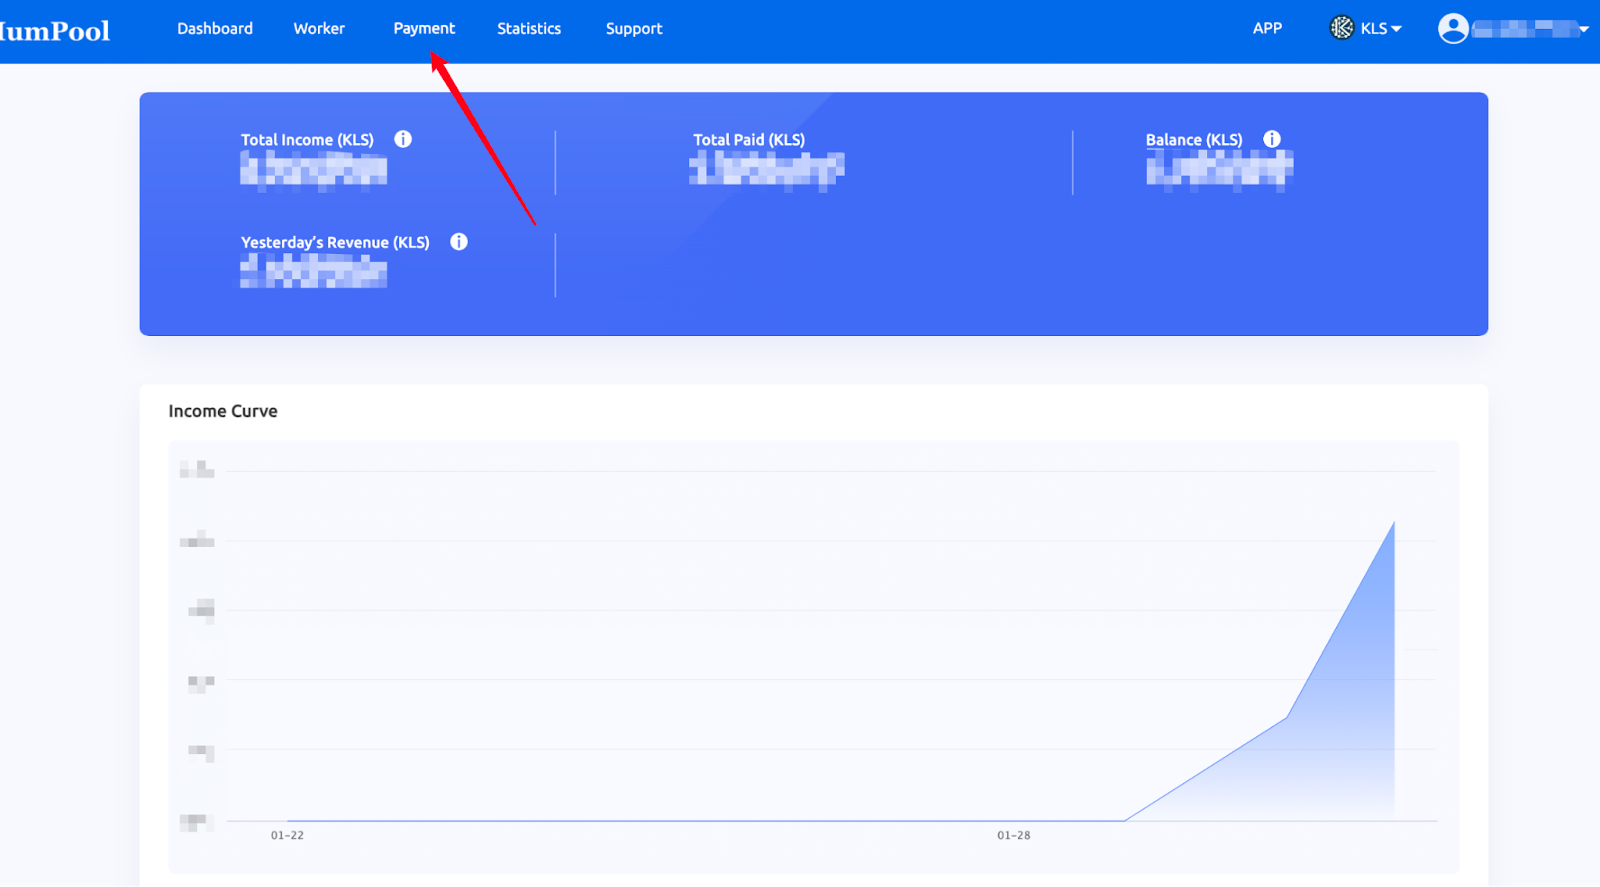
After the machine runs for a while and submits the data to the mining pool, you can check the operating status and income of the mining machine and enter HumPool(https://www.humpool.com/)website,After logging in, switch the currency you want to view to IRON and click the [Income Payment] button in the navigation menu to view the status and income of the mining machine.
Total income: The accumulated income of the current mining account, including total expenditure and account balance
Total expenditure: The total amount of system settlement received by the current mining account
Account balance: If the payment address is not filled in, one day after updating the address, or the income is less than the threshold, the income will be stored in the mining pool and displayed as a balance.
Yesterday's earnings: 24 hours before 00:00 UTC on the day
The Iron Fish (IRON) mainnet will perform a hard fork upgrade at block height 503,338, expected to take place on 2024-04-02. As a result, the IRON mining algorithm will shift from Blake3 to FishHash.
Note that FishHash only supports GPU mining; FPGA machines will be incompatible.
This guide is tailored towards the FishHash algorithm.
Iron Fish (IRON) is a Proof-of-Work blockchain for privacy platform for web3 using ZKPs. Its multi-asset functionality enables bridge providers to transfer any crypto asset to the Iron Fish network for private transactions.
To get more familiar with Iron Fish, you may check out the official website and block explorer.
The mining algorithm of Iron Fish is FishHash, supporting GPU mining. In this mining guide, we will walk you through the settings and process of mining Iron Fish at HumPool.
Iron Fish can be efficiently mined with GPUs (with at least 5 GB of memory).
Iron Fish cannot be efficiently mined with CPUs.
Iron Fish cannot be efficiently mined with FPGAs or ASICs.
View our Miners page to discover the most profitable machines for IRON mining.
kucoin:https://www.kucoin.com/
Gate:https://www.gate.io/
The exchange also provides a string of Memo characters, which needs to be configured in the management background of the mining machine. The configuration format is: wallet address + Memo.miner name.
Note: Different countries have varying regulatory policies for exchanges, and the associated risks are the responsibility of the miner.


You will need to create an HumPool account before mining Iron Fish. If you do not have one yet, please click here to register.
Setting an account name will be required for configuration. You are free to create multiple subaccounts to monitor your mining machines.
Rigel, lolMiner, and SRBMiner are some of the popular options for mining Iron Fish.
Replace the file’s existing commands with the commands from the chart below that correspond to your chosen mining software.
| Software | Commands | GPU Types |
|---|---|---|
| Rigel | rigel.exe -a fishhash -o stratum+tcp://iron.asia1.humpool.com:13800 -u account_name -w worker_name | NVIDIA |
| lolMiner | lolminer.exe -a FISHHASH -p iron.asia1.humpool.com:13800 -u account_name.worker_name | NVIDIA & AMD |
| SRBMiner | SRBMiner-MULTI.exe --algorithm fishhash --pool iron.asia1.humpool.com:13800 --wallet account_name.worker_name | NVIDIA & AMD |
| GPU Or FPGA Dedicated |
|---|
| stratum+tcp://iron.us1.humpool.com:13800 |
| stratum+tcp://iron.eu1.humpool.com:13800 |
| stratum+tcp://iron.asia1.humpool.com:13800 |
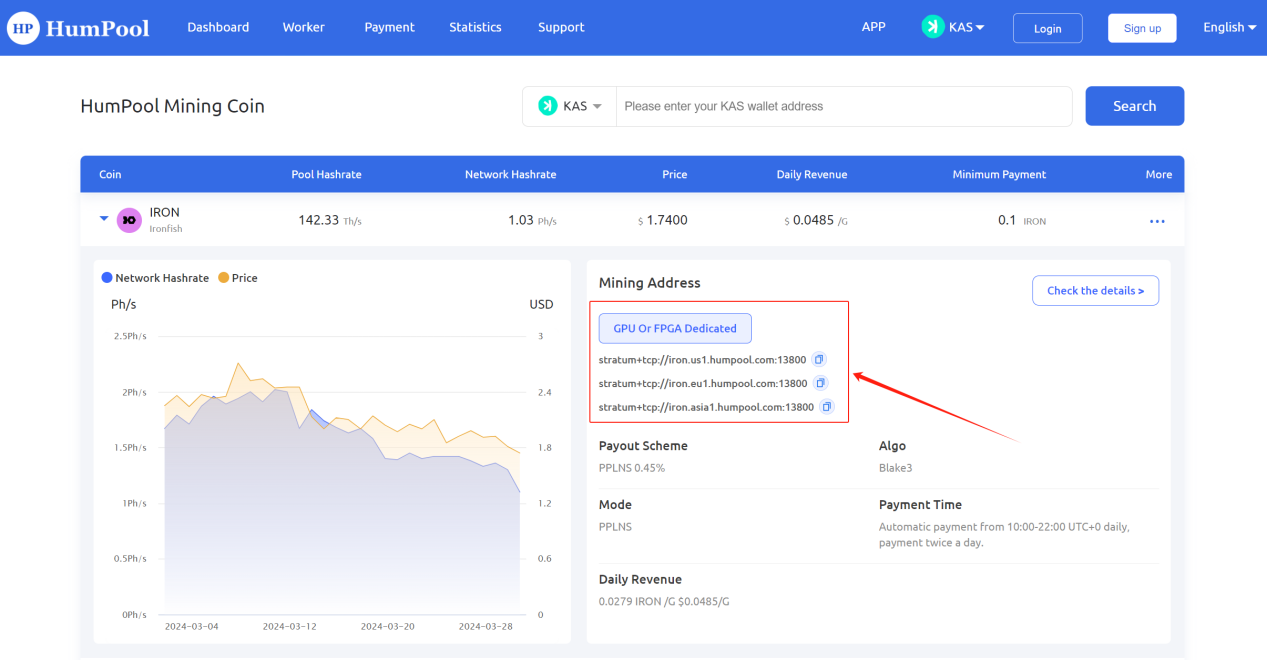
Your machines are now ready to mine! You can manage your account settings and monitor your hashrate, rewards and so on in your dashboard or in our HumPool app.
Thank you for your support and understanding, HumPool will continue to provide you with reliable mining services.
If you have any questions or need help with Iron Fish mining, you can consult customer service.
To log in to mine, you need to register a HumPool account and bind the KAS wallet address to mine. At the same time, you can modify the minimum payment amount of KAS and experience more new login mining functions.
Open the HumPool official website (https://www.humpool.com/)and complete the registration according to the instructions to obtain the account name. After logging in to the account, copy the account name in the personal center to configure mining parameters.
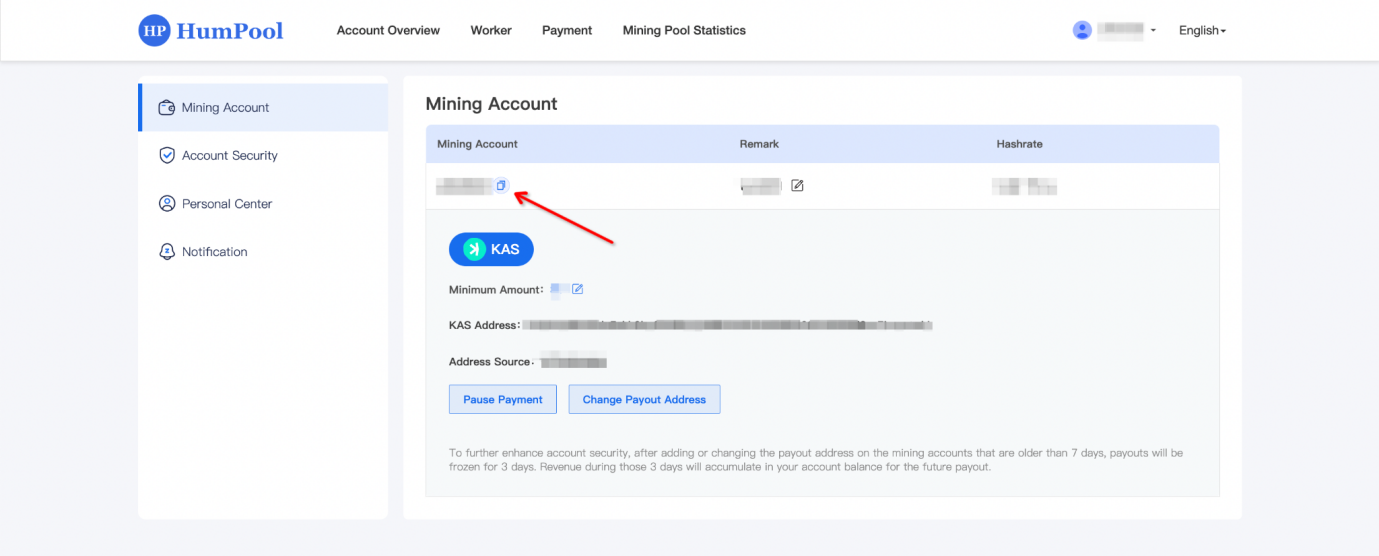
After you start mining, the mining income will be automatically accumulated in the mining account, and you can receive the income after binding the wallet.
Enter the miner's IP address in your browser's address bar to access the miner's backend, or use the official batch management software provided by the miner to configure the following settings:
HumPool / URL:stratum+tcp://kas.asia1.humpool.com:18083
User / Worker:Account name. Miner number (This should be the HumPool account name you set during registration, not your wallet address or email. The account name and worker name are separated by a period " . ". The worker name must be between 6-15 characters, using lowercase letters or numbers, and must start with a letter.)
Password:Set any password (e.g., 123)
After verifying that the information is correct, save the settings. Within a short time, the miner will begin operation, and you can start earning rewards.
| LOW DIFF(KS0 and KS0 PRO) | ASIC Dedicated |
|---|---|
| stratum+tcp://kas.eu1.humpool.com:18081 | stratum+tcp://kas.eu1.humpool.com:18083 |
| stratum+tcp://kas.us1.humpool.com:18081 | stratum+tcp://kas.us1.humpool.com:18083 |
| stratum+tcp://kas.asia1.humpool.com:18081 | stratum+tcp://kas.asia1.humpool.com:18083 |
| stratum+ssl://kas.eu1.humpool.com:18082 | |
| stratum+ssl://kas.us1.humpool.com:18082 |
Exchange deposit address:Login the exchange to obtain KAS deposit address
kucoin:https://www.kucoin.com/
Bitget:https://www.bitget.com/
Note: Different countries have varying regulatory policies for exchanges, and the associated risks are the responsibility of the miner.
After the machine runs for a while and submits data to the mining pool, you can check the running status and income of the mining machine. Open the HumPool official website (https://www.humpool.com/), log in and switch the currency you want to view to KAS, that is You can check the status and income of the mining machine.
Alephium is a layer-1 blockchain that combines innovative sharding, expressive sUTXO, and efficient Proof-of-Less-Work to secure scalable dApps for real-world applications.
Its native token, ALPH, supports the Blake3 mining algorithm and is compatible with ASIC mining devices. In this mining guide, we will walk you through the settings and process of mining Alephium (ALPH) at HumPool.
1. Register a HumPool Account
To mine via login, you need to register an account and obtain a username.
Visit the official HumPool website (https://www.humpool.com/), follow the registration instructions to create an account, and you'll get your username. After logging in, go to **Account Settings** and copy your username to configure your mining settings.

2. Bind Wallet to Receive Earnings
You must bind an ALPH wallet address to receive your mining earnings.
After you start mining, your earnings will automatically accumulate in your mining account. Once your wallet address is bound, you will be able to receive your earnings. The earnings distribution schedule is as follows: - Automatic payouts occur twice daily, 10:00 AM and 10:00 PM (UTC+0).

3. Set Mining Parameters
Enter the miner's IP address in your browser's address bar to access the miner's backend, or use the official batch management software provided by the miner to configure the following settings:
HumPool / URL:stratum+tcp://alph.us1.humpool.com:12581
User / Worker:Account name. Miner number (This should be the HumPool account name you set during registration, not your wallet address or email. The account name and worker name are separated by a period " . ". The worker name must be between 6-15 characters, using lowercase letters or numbers, and must start with a letter.)
Password:Set any password (e.g., 123)
After verifying that the information is correct, save the settings. Within a short time, the miner will begin operation, and you can start earning rewards.
4. Mining machine monitoring and income viewing
Once the machine has run for a while and submitted data to the pool, you can check the status of the miner and your earnings. Go to the HumPool website (https://www.humpool.com/), log in, and switch the displayed coin type to ALPH to view the miner's status and earnings.
1. Register a HumPool Account
To mine via login, you need to register an account and obtain a username.
Visit the official HumPool website (https://www.humpool.com/), follow the registration instructions to create an account, and you'll get your username. After logging in, go to **Account Settings** and copy your username to configure your mining settings.

2. Bind Wallet to Receive Earnings
You must bind an RXD wallet address to receive your mining earnings.
After you start mining, your earnings will automatically accumulate in your mining account. Once your wallet address is bound, you will be able to receive your earnings. The earnings distribution schedule is as follows: - Automatic payouts occur twice daily, 10:00 AM and 10:00 PM (UTC+0).

3. Set Mining Parameters
Enter the miner's IP address in your browser's address bar to access the miner's backend, or use the official batch management software provided by the miner to configure the following settings:
HumPool / URL:stratum+tcp://rxd.us1.humpool.com:11800
User / Worker:Account name. Miner number (This should be the HumPool account name you set during registration, not your wallet address or email. The account name and worker name are separated by a period " . ". The worker name must be between 6-15 characters, using lowercase letters or numbers, and must start with a letter.)
Password:Set any password (e.g., 123)
After verifying that the information is correct, save the settings. Within a short time, the miner will begin operation, and you can start earning rewards.
4. Mining machine monitoring and income viewing
Once the machine has run for a while and submitted data to the pool, you can check the status of the miner and your earnings. Go to the HumPool website (https://www.humpool.com/), log in, and switch the displayed coin type to RXD to view the miner's status and earnings.
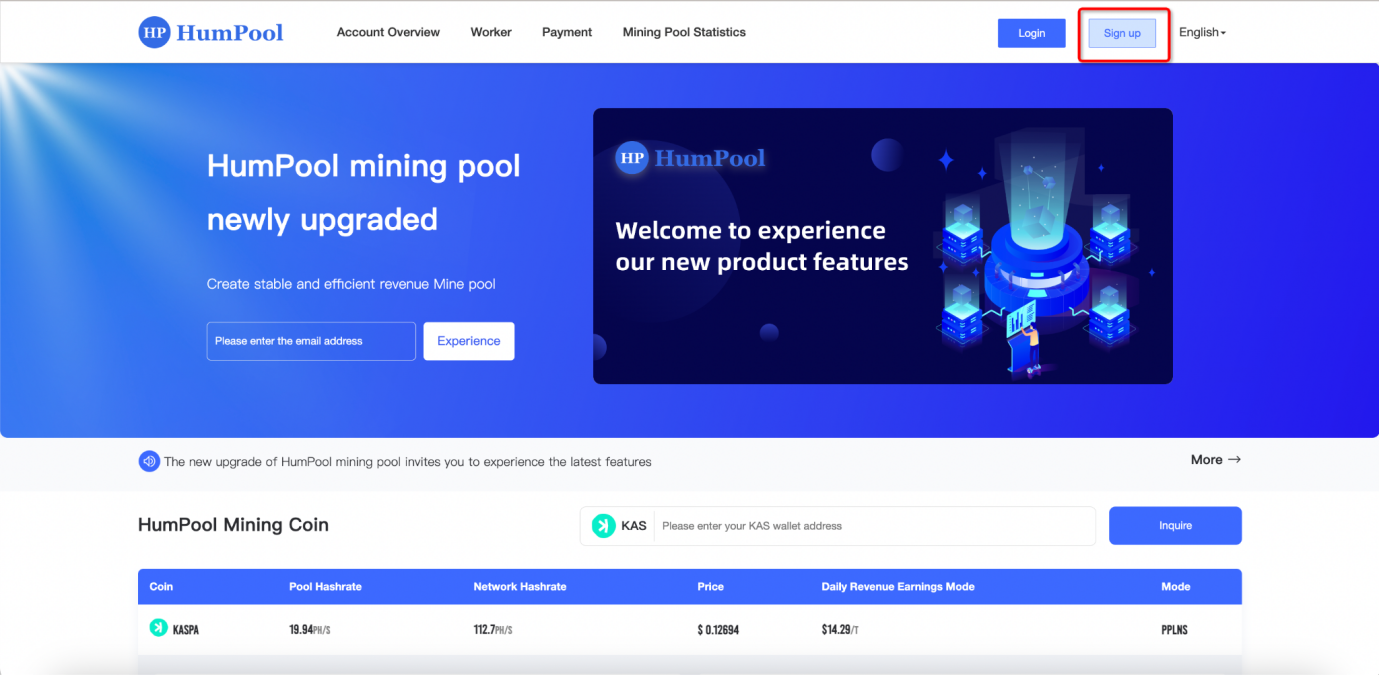
Step 1: Open the HumPool official website (https://www.humpool.com/), click the [Sign up] button in the navigation menu, and enter the registration page to start registration.
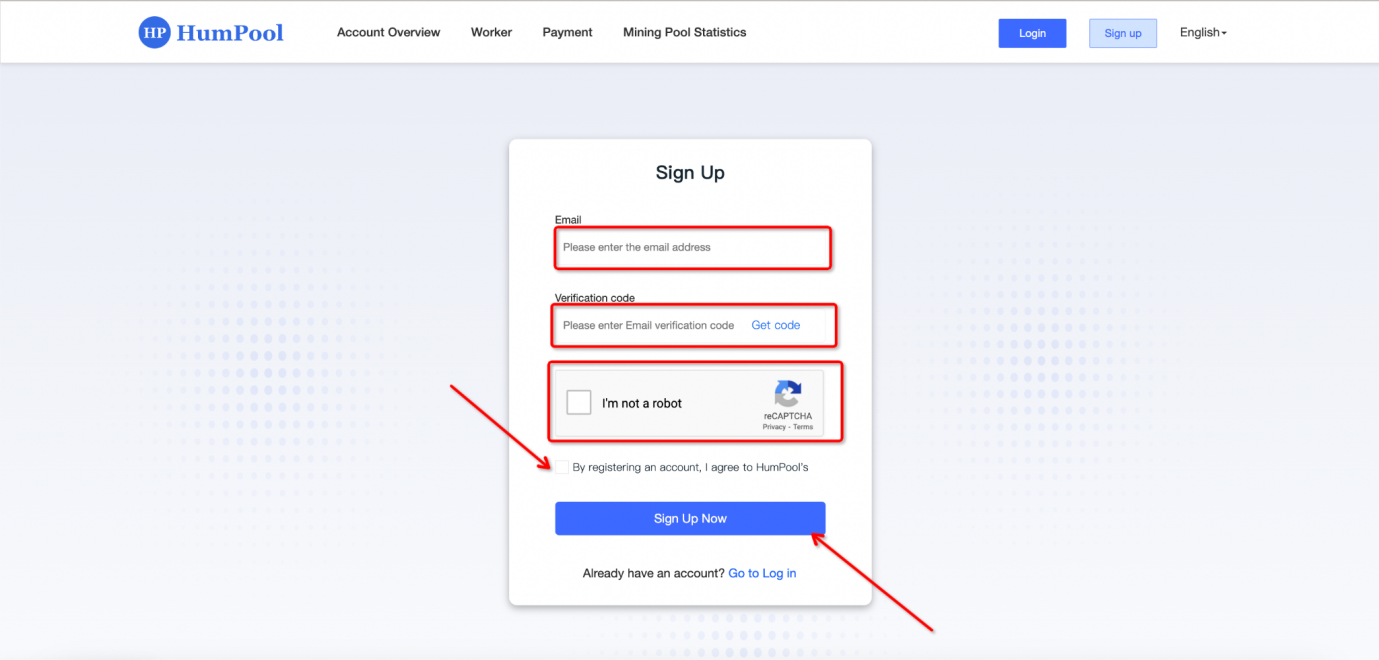
Step 2: Enter the registration page, fill in your email, get the email verification code, check the registration agreement, and click the [Register Now] button to enter the next registration page.
Step 3: Fill in the account name (the account name must contain 6 to 15 lowercase letters or numbers and start with a letter), fill in the login password (the login password is 8 to 32 characters), and click the [Confirm] button to complete the registration.
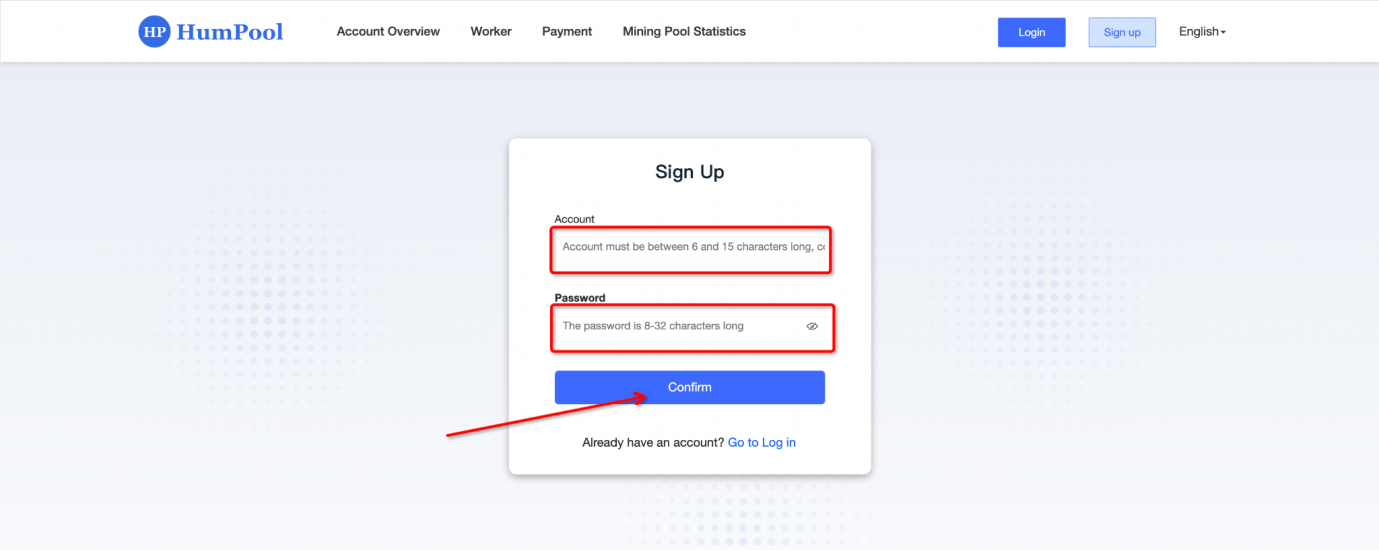
After the mining account is successfully registered, for account security, a page for binding Google two-factor authentication will pop up in the personal center. Click [Bind Now] and follow the binding process prompted on the page to bind.
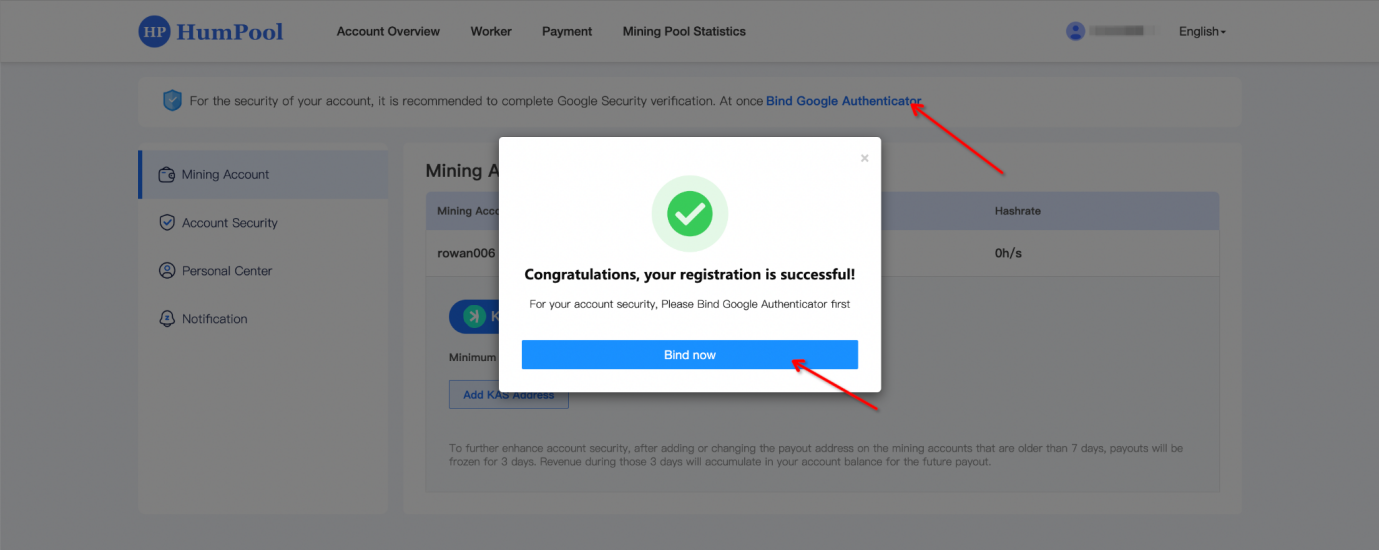
Step 1: Get the email verification code, click the [Get Verification Code] button, the system will send the verification code, go to the email to check the verification code, enter the email verification code in the text box, and click the [Next] button to continue binding.
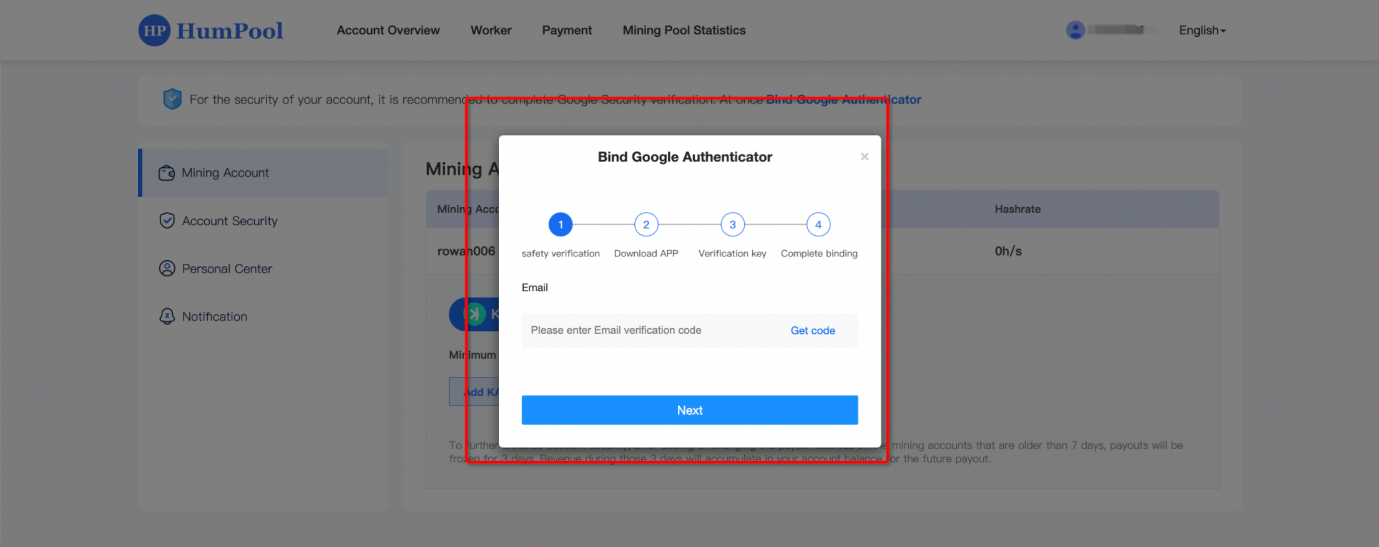
Step 2: After the email is verified, enter the download page of the Google Authenticator APP. If you have already downloaded the Google Authenticator APP, you can directly click the [Next] button to continue binding.
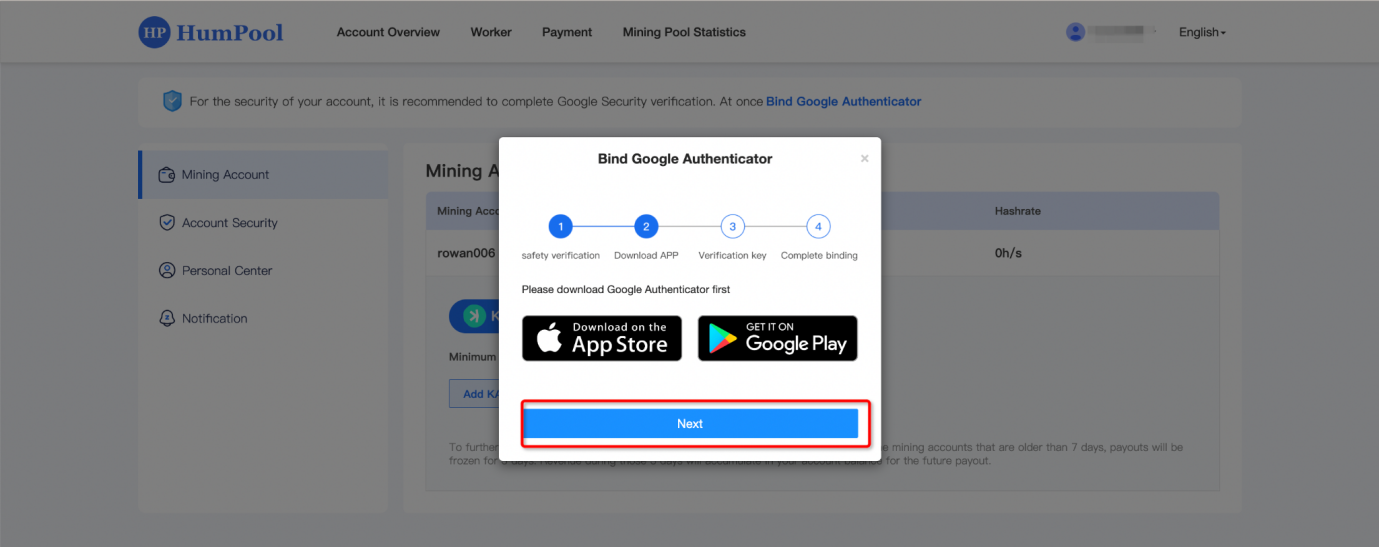
Step 3: Use the downloaded Google Authenticator APP, scan the QR code or copy the key and paste it into the Google Authenticator APP. A 6-digit Google verification code will be generated. Fill in the 6-digit verification code in the text box. code and click the [Confirm] button to complete Google two-factor verification.
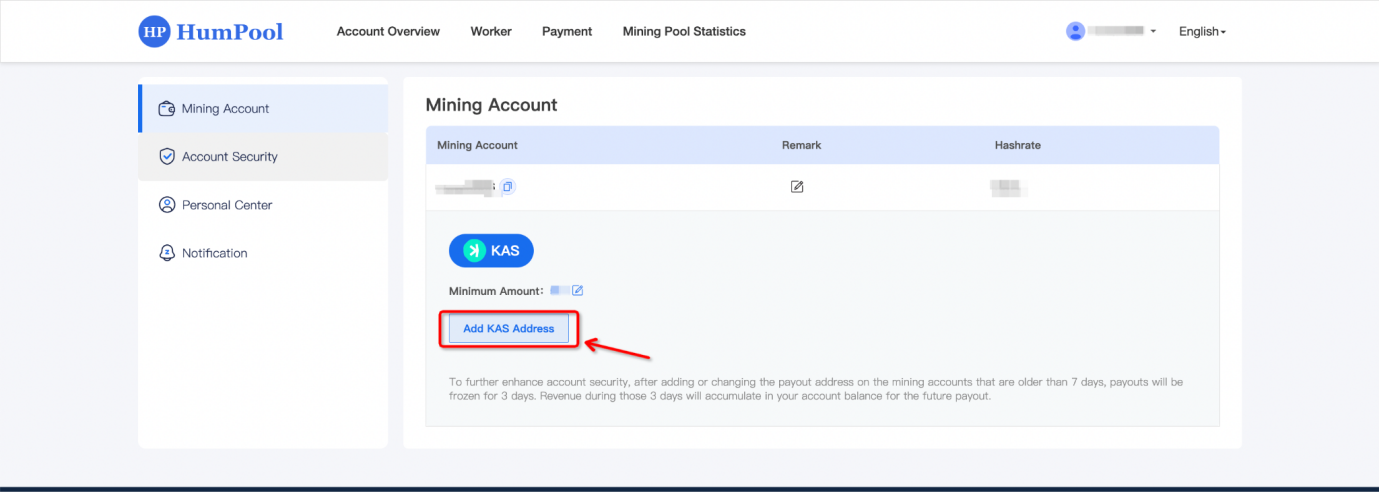
After the mining account registration is completed, the wallet address system needs to be configured to settle the income for you. Take adding a KAS wallet address as an example. Follow the prompts on the page to add the KAS wallet address.
After successfully logging in, click the [Add KAS Address] button on the mining account page, and the page to add the KAS address will pop up. Just add it according to the content that needs to be filled in on the page.
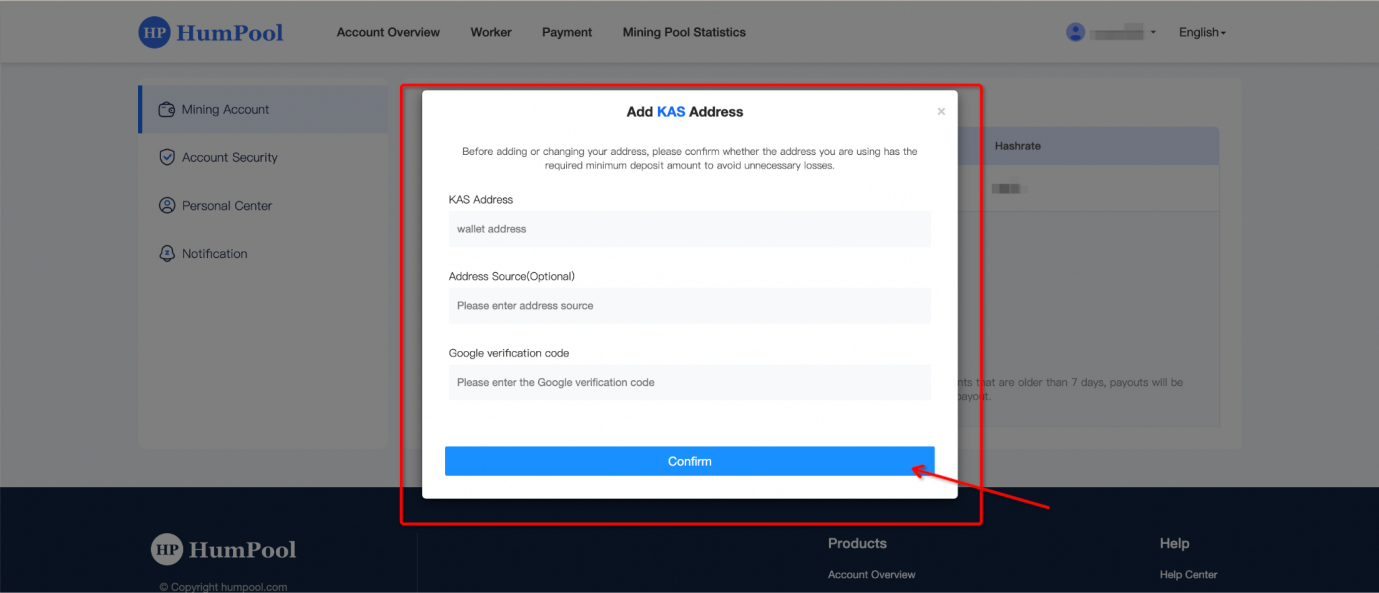
Enter the KAS wallet address, address source (optional), and Google verification code on the pop-up page. After entering the information, click [Confirm]. The system will send an activation email to your email. You need to log in to your email and click KAS Click the activation link of the address to activate and the addition is complete.
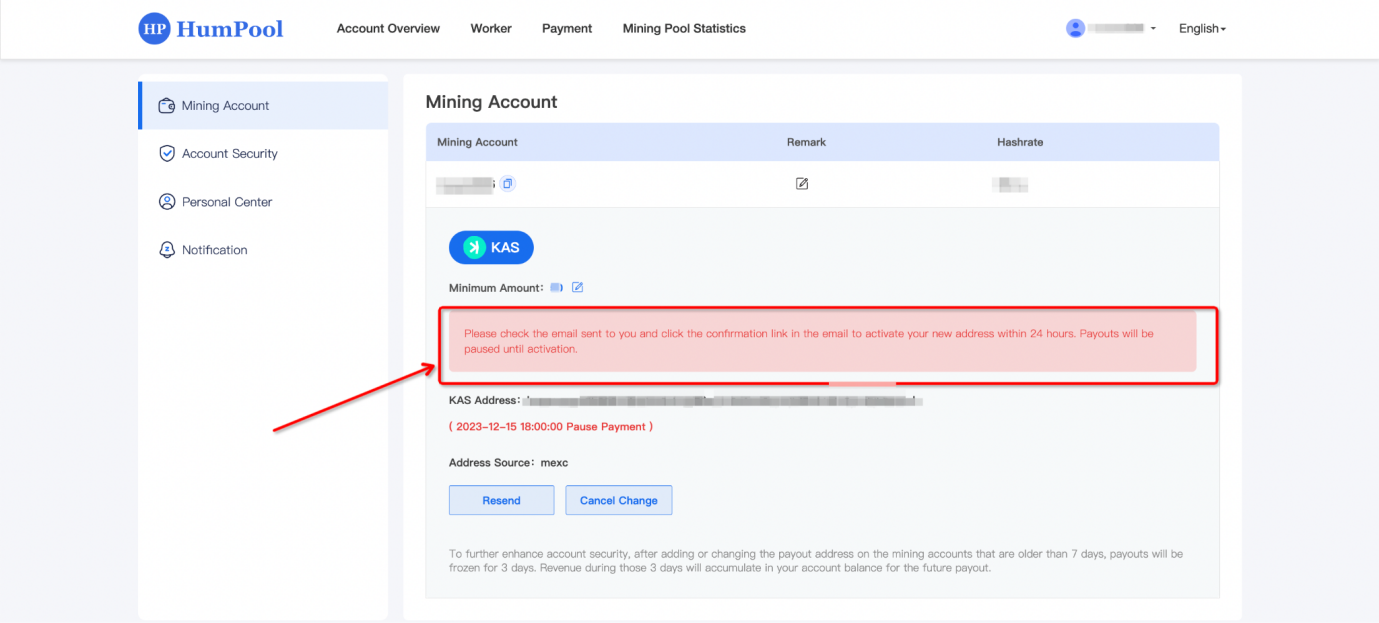
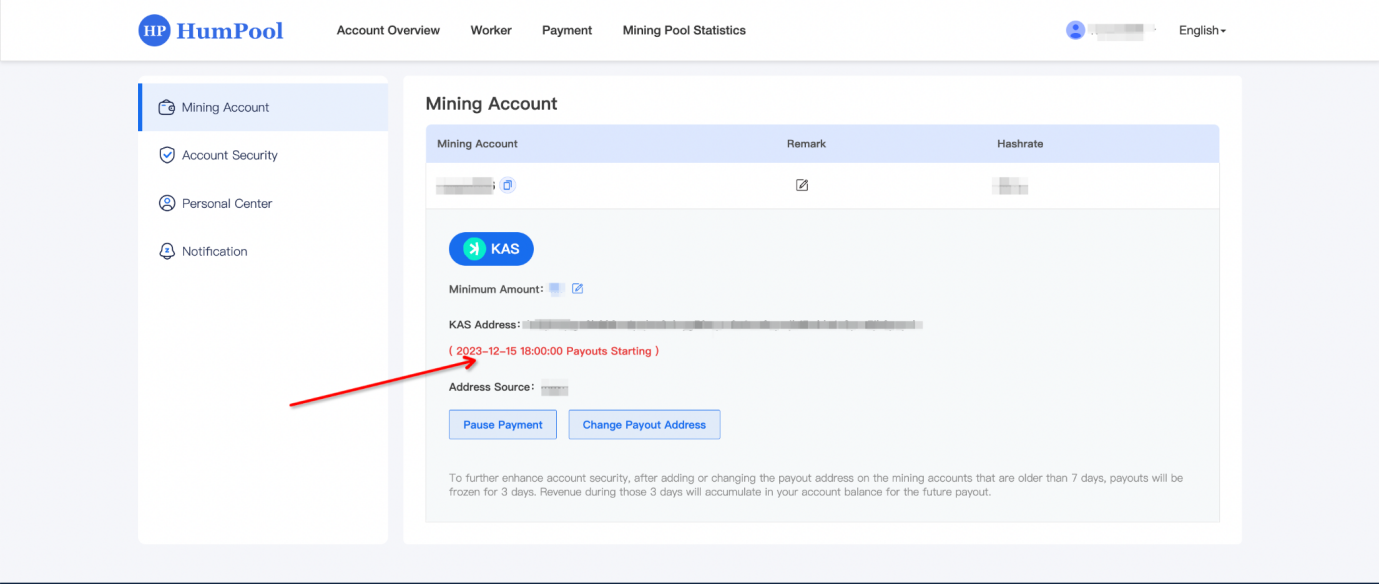
Enter your email to activate the KAS wallet address. After successful activation, you will return to the mining account page of the HumPool system. The date when the payment will start is displayed to indicate that the addition is completed. The system will automatically settle the mining income for you according to the date.
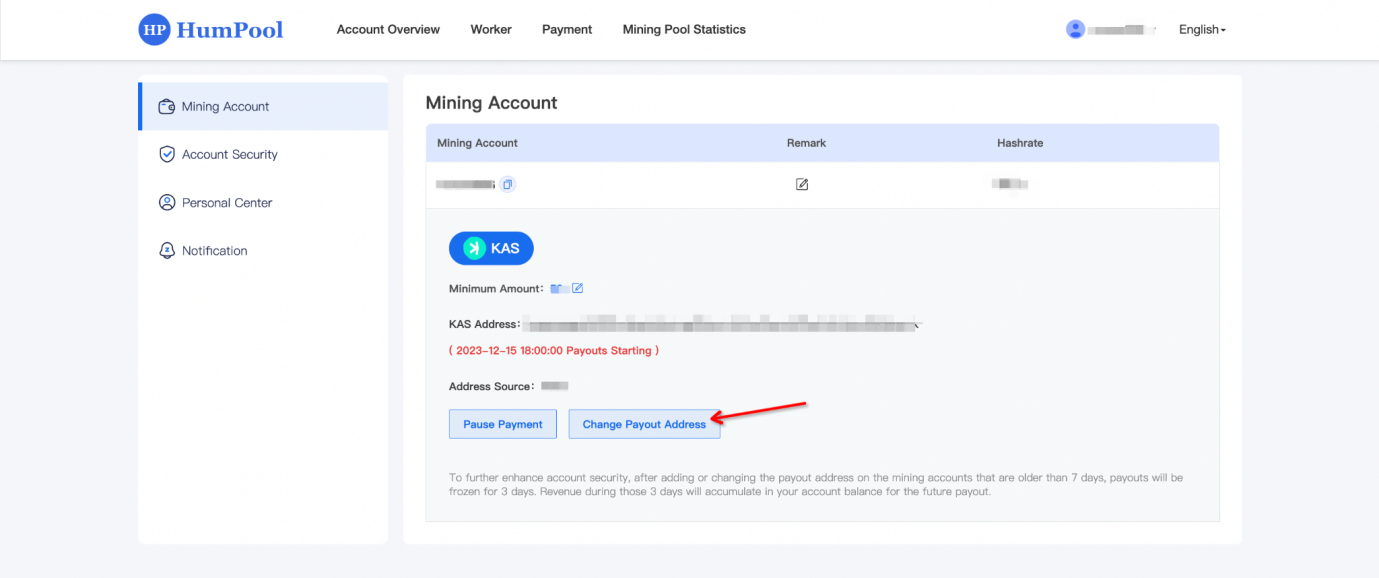
After the wallet address is added and activated, you can modify the wallet address according to your own needs. Click [Change Payout Address] to pop up the address modification page, and modify it according to the prompts on the page.
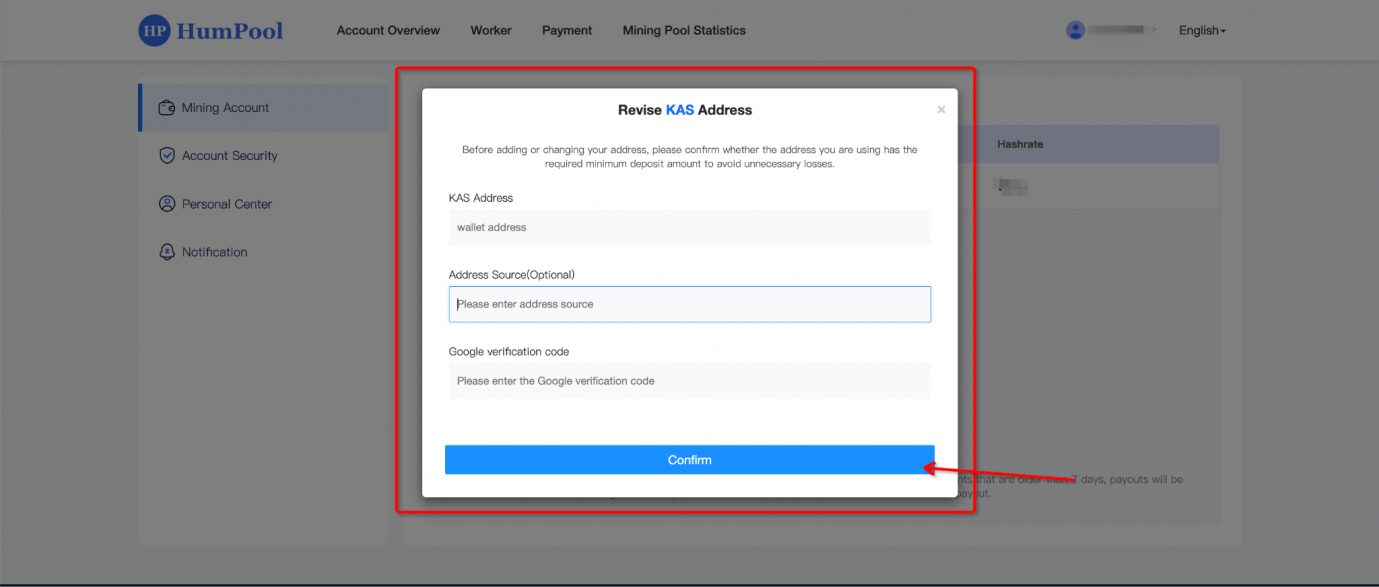
Enter the KAS wallet address, address source (optional), and Google verification code on the pop-up page. After entering the information, click [Confirm]. The system will send an activation email to your email. You need to log in to your email and click KAS Address connection, the modification can be completed after activating the address KAS address.
Before modifying the payout threshold, you need to log in to your mining account. Please click the 【Login】 button in the navigation bar to log in.

Enter the email address and password for the account you want to log in to, complete the CAPTCHA, and click the 【Login】 button. If you don’t have a HumPool account yet, please click the 【Register now】button to sign up.

3、Click on the 【Account Name】 in the navigation bar, and then select 【Account Settings】 from the dropdown menu to enter the account settings page.

Modifying the minimum payment amount takes KAS as an example. The default minimum payment amount of the HumPool mining pool is 30. You can modify the minimum payment amount by logging in to the mining mode and click the [Modify] button in the minimum payment amount column on the mining account page to modify it.

Enter the minimum payment amount on the page of the modification pop-up window. You can increase or decrease it according to your needs. The current minimum cannot be less than 15. After completing the input, click the [Confirm] button to complete the modification.
When the total amount of mining reaches the minimum threshold amount you set, the system will automatically settle it into your wallet account. The part less than the minimum threshold amount will be retained in the account balance. If the minimum threshold amount is met, settlement will continue.

After logging in, if you mine through your account name, you can click the [Payment] button in the navigation bar to enter the income payment page, view the account's income information, income trend chart and settlement record information, and you can check the mining income without entering the wallet address. information.
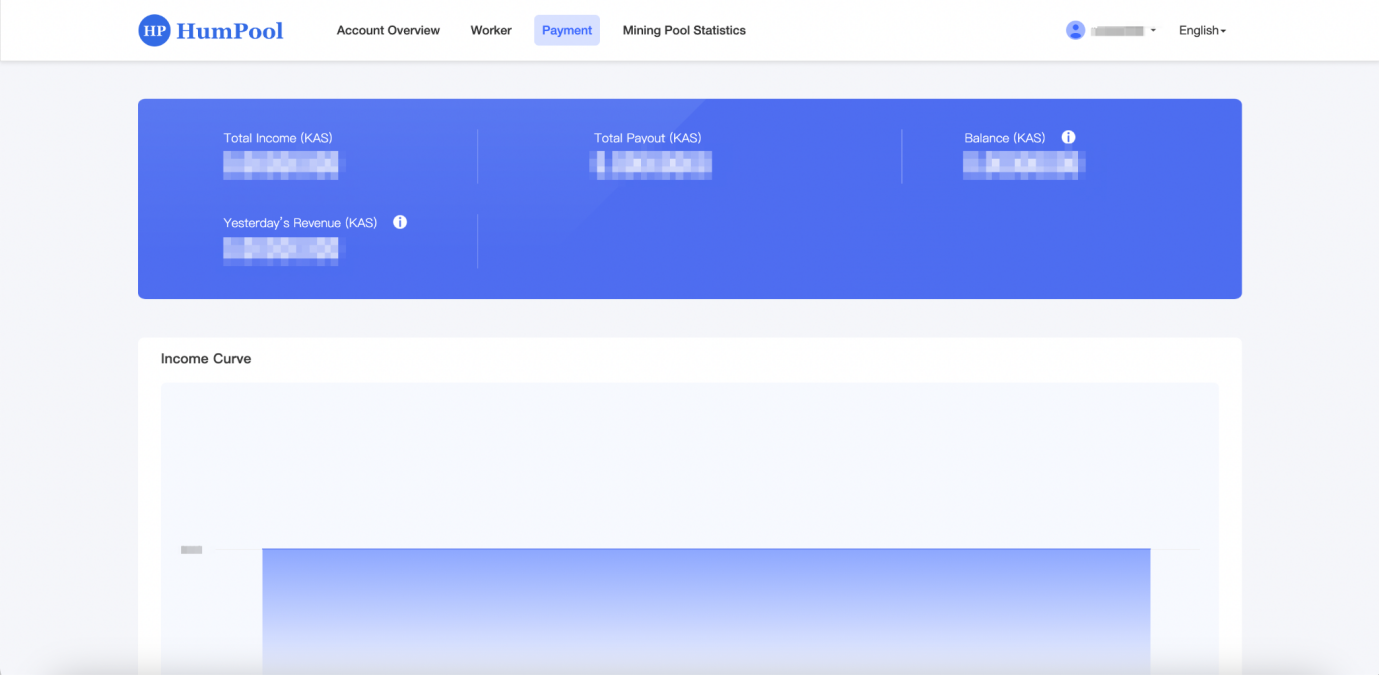
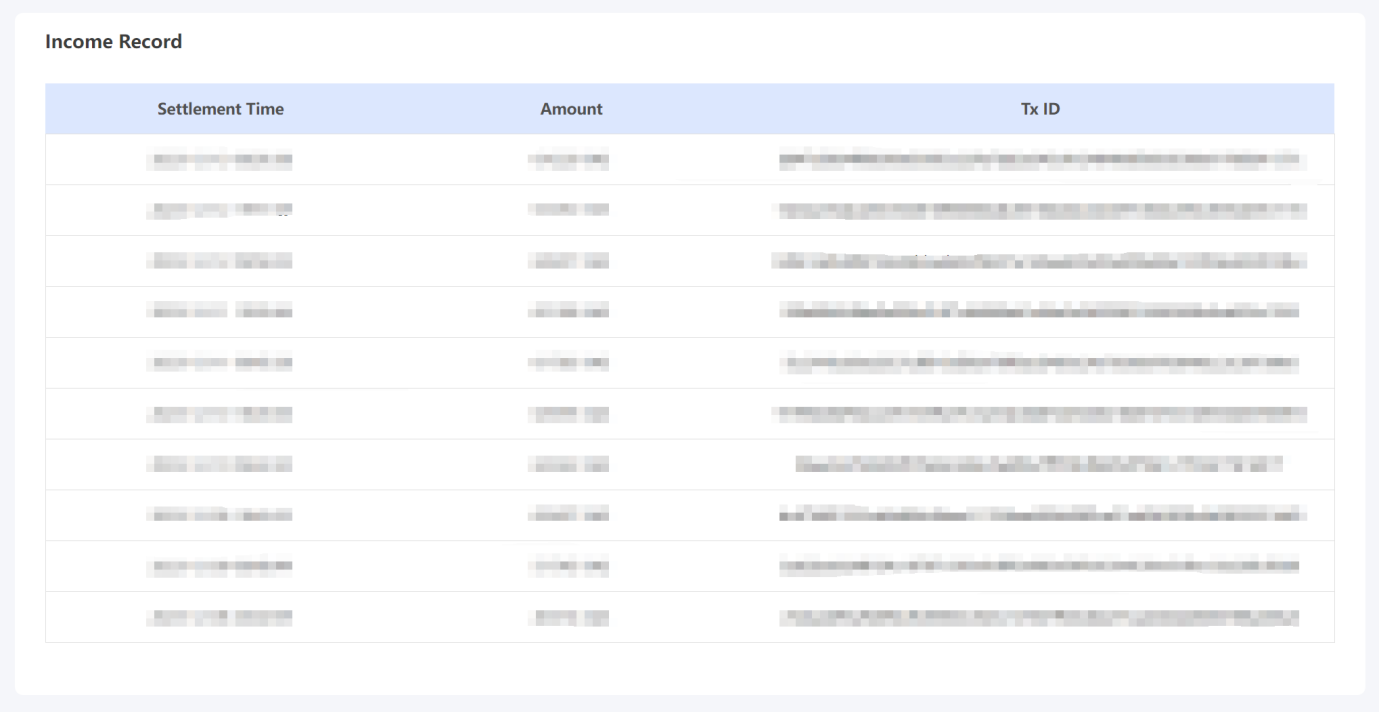
Total income (KAS): Accumulated income of mining account, including total expenditure + account balance
Total payout (KAS): The total revenue that has been paid and settled by the current mining account.
Account Balance (KAS): The unpaid income of the current mining account due to insufficient payment threshold, modified address freezing period, suspension of payment
Yesterday's earnings (KAS): earnings 24 hours before 00:00 UTC on the current day
Time (UTC+0): The time when the current mining account income is paid, calculated according to (UTC+0)
Quantity: The actual amount of mining revenue paid by the system
Transaction ID: The ID of the transaction on the system’s payment mining revenue chain
After logging in and mining through the account name, you can click the [Worker] button in the navigation bar to view the miners added to the mining account, including all miners, online miners, offline miners, invalid miners, and the hashrate data generated by each miner. information.
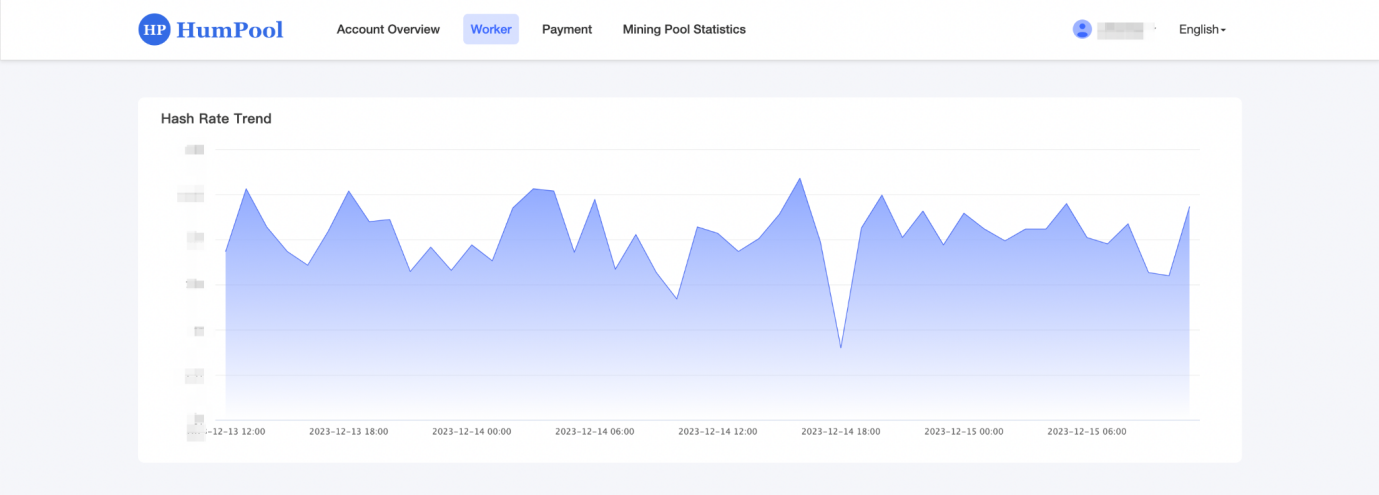
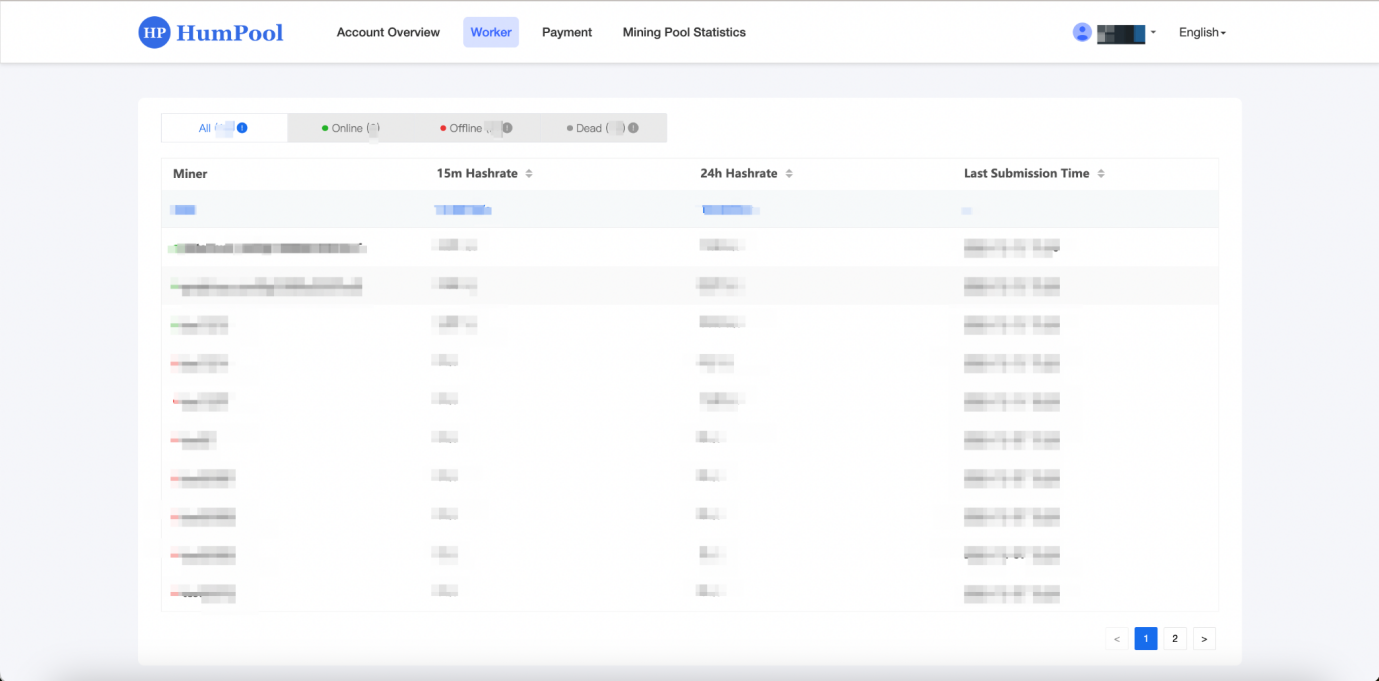
All: The number of all mining machines in the current mining account.
Online: The number of mining machines operating normally under the current mining account.
Offline: If the current mining account does not submit shares to the mining pool for more than 10 minutes, it will be counted as offline.
Invalid miner: If the current mining account does not submit shares to the mining pool for more than 24 hours, it will be counted as invalid.
Miner name: The mining pool will automatically display the miner name set by the user in the mining machine system or mining software.
15-minute average hashrate: The current time is the average hashrate 15 minutes before the starting point
24-hour average hashrate: The current time is the average hashrate 24 hours before the starting point
Last submission time: the time when the miner last submitted hashrate to the mining pool, generally no more than 3 minutes from the current time.
What is Kaspa Transaction Kaspa Acceleration?
Kaspa Transaction Acceleration is a service used to speed up the confirmation speed of cryptocurrency transactions. The speed of cryptocurrency network transactions is affected by factors such as network congestion, transaction fees, and block size. By using this service, miners will prioritize transactions, allowing them to be confirmed faster than originally.
Explanation of Payment Methods for Kaspa Transaction Acceleration
Currently, HumPool transaction acceleration offers two payment methods: 【 Balance】 and 【On-Chain Payment】. If users choose 【Balance】, they need to ensure that their account balance has sufficient USDT. If they choose 【On-Chain Payment】, they will be redirected to a third-party payment platform.
USDT Account Balance Deposit Tutorial
1. Log in to your HumPool account, and click on 【Transaction Accelerator】 in the navigation bar to enter the transaction acceleration page.

2. Click the 【Deposit】 button under 【Account Balance】.

3. Enter the amount you want to deposit and click 【Deposit Now】.
Recharging using an exchange or wallet may incur handling fees. Please pay attention to the required handling fee amount. The transfer amount from the exchange or wallet should be recharged together with the handling fee amount.
Please pay according to the actual recharge amount, do not change the recharge amount at will, otherwise you will not be able to Timely recharge into your account.

4. After a successful deposit, click 【Transaction History】 to view the account balance history.


How to Use Kaspa Transaction Accelerator
1. Log in to your HumPool account, and click on 【Transaction Accelerator】 in the navigation bar to enter the transaction acceleration page.

2. Enter the transaction ID (TxID) that you want to accelerator, and click 【Calculation Fees】.

3. Verify the transaction ID and estimated cost for acceleration, select 【Payment Method】, and then click 【Confirm Payment】.

4. After successful payment, click 【Accelerator Records】 to view the accelerator records.


Notes:
- The time it takes to confirm your transaction after using a transaction accelerator varies based on several factors, including network traffic, transaction fees, and the involvement of mining pools. While accelerators aim to speed up the confirmation process, a specific timeframe cannot be guaranteed.
- Typically, transaction accelerators can get your transactions confirmed within the next few blocks. However, it ultimately depends on the mining resources and the network’s state. A transaction accelerator only increases the likelihood of your transaction getting confirmed faster than usual, but it cannot guarantee the exact confirmation time.
- You cannot cancel transaction acceleration requests, and no refunds will be provided.


